Greetings @Aaronwith2dots , @Silvia80 , @tony ,@LievenDV , @BurnsRhythm , @roger_holland , @TheMadman_tobyjenner , @Silvia80 and community members following this topic
Summary: My Breedlove guitar had a fatal 2-way humidifier failure, It blew up and the humidifier beads cause the back of the guitar to lift. In Part1 I described in detail the problem and worked on scraping out those little demon crystals. I them set about airing the guitar out and letting the back shift back into shape.
In Part 2 I’m, going to show you what I used to make Spool Clamps on the cheap, describe the gluing process and show the results.
Making Spool Clamps : Spool clamps are often used to attach the top or back to the sides. StewMac sells a beautiful set of 6 for about $58.00 US. I thought I could make some on my own (use Okie Engineering skills). I gould make 50 clamps for about $45. I looked for wooden spools, threaded rods, wing nuts, cork or felt.
Here’s what I came up with and what I used:
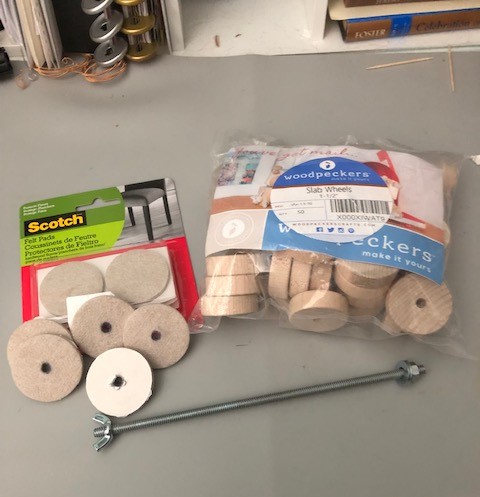
Wooden Spools: I got those from Amazon. They are used to make children’s wooded toys like, wooden cares and trains. 1.5 " in diameter and the hole in the center was 1/4" in diameter. They were Woodpeckers brand
Threaded rods. I initially looked for bolts. But I could not find anything 8" long. So then a decided on using threaded rods. I figured I could put a nut on one end, and a wing nut on the other end for ease of adjustment. I got a 3 foot rods and asked the dear husband to hack saw them for me. I got 3 8" rods and 1 12" rod out of each 3 foot section. I purchased 3 rods. Got these at the local hardware store. They were 1/4" diameter rods. It is a good idea to bring one of your wooden spools to test the rods to see if you’ve got a good fit.
Cushioning–Cork or Felt. Well most spool clamps have a piece of cork lining the side of the spool that touches the guitar. I found on Amazon cork lining that had a sticky side. I would just have to cut it out. I thought that would be too much work. So instead, I purchased felt furniture pads. I pushed a hole in the middle of those with a pair of scissors.

How did they work? Well, I found the felt was a little slippy. That may be why cork is used. Cushion and grip. So next big project I’ll go ahead mad make cork cushions for the spools. The spool on the left shows the felt or in the future the cork, goes in the inside of the space between the spools.
Process: I used Titebond original in the opening of the back and used a toothpick to push the glue as far back as there was space. I wiped off any excess. I laid a piece of wax paper and I think piece of craft wood over the area being joined and clamped it down. Left it overnight.
In the morning I was pretty satisfied with the glue job. There was some slight space between the binding and the edge of the back in the two areas that had lifted (see pictures from Part 1). I used thin Starbond Thin Glue (water thin CA or super glue) and with a pipette, I carefully wicked glue into those crevices and pressed down.
I also had a couple of places where the laminate cracked or looked like it might peel. I used the pipette and this glue and capillary action to get the glue into those cracks and under the laminate. I did an immediate wipe with a towel.
Results:
Here’s how it all looks now:
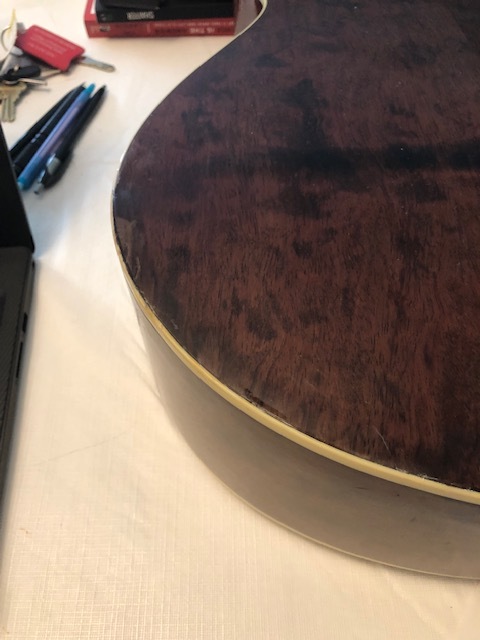
From the top left of the frame down to the bottom right you can see that everything is laying flush.

The bottom of this picture shows ia close up of the top left are from the previous picture. This section was the most damaged with lifted section, cracks and laminate peeling (lifting). Now you may not be able to tell but this section is 100% silky smooth. I did take 1000, and 2000 sandpaper to the edge to smooth off glue bumps. This was am important goal. I wanted everything to lay down. But, I also wanted everything smooth. I did not want any areas that could catch on fabric, clothes, wiping towels, etc.
Cosmetically close up there are some imperfections. The lifted laminate is a little lighter in color. But hand feel wise. It is very level and smooth feeling.
Next Step. The fret nut fell off so I am gluing that back in. Once that sits overnight I hope to string it up tomorrow and see if this puppy can play.
Hope you enjoyed my experiment.
Rose