I’ve been mulling this idea for quite some time. I have a loose idea of what I’m after. For one, I want something a little different from my Epiphone Les Paul in sound and layout, so I think I’ll go with either a SSS or HSS strat-ish shape. My plan is to build the body from scratch and use a bolt-on neck. Depending on how things go with this, I might splurge and buy an Aluminati neck that’s made locally. Another reason I want to do this is that I want the finish to showcase natural wood grain and to stay away from any bursts or paint finishes.
I would like to use a wood that has an interesting story. Maybe something from local trees (southeastern US), or some reclaimed architectural salvage. I would be thrilled if I could source something that was hurricane Helene debris of some sort. I called around in the spring to some local sawmills and found one that has some trees they salvaged from the storm that they plan to offer for sale once they’ve cured and been kiln dried, which probably won’t be for another year. If this guitar build goes well, then I might make another from some of that wood.
I’ve done a touch of woodworking and a bit of electrical and soldering work so I think I have a base from which to work on this. Though I should probably get a good instructional book that covers electric guitar building for some stuff I may not have considered. There are certainly tools that I don’t have which will make the process go faster, but I have access to an amazing nonprofit tool rental place in town where I can get most of what I need.
First question is if anyone has recommendations for a really good book about building an electric guitar?
Maybe that will help me refine the shape I want, too. I’ve browsed a bunch of templates online and I’m not sure I want to go that route for the overall body shape. Though using templates to dial in bridge and pickup placements is a given.
My immediate thought was Swamp Ash. See the PRS SwampAsh Special to see if you like the wood grain. I do. I also have two guitars in black walnut veneer, but that may be far more than you plan to bite off.
For the electrical, there is very little you need to know. if you can hold a soldering iron without burning yourself, you have 90% of what you need. I wrote a tutorial a while back you can review your current knowledge with.
Consider using measurements to get the neck in the right place. You will need to set the bridge-to-nut distance correctly for fretwork to be in the right location. This means the neck you select will be part of the design before you get too far into your decisions and certainly before you start cutting.
There are others likely to add their experience. Check out other build topics for stuff to read!
If I had the time, this would be a fun thing to do myself.
This does not answer you question but it does relate. Have you ever seen cindyguitar
She makes guitars from super old reclaimed wood from torn down buildings in NYC. It is really cool and she does amazing work. She does some detailed videos. You may get some ideas from her site, but no actual tutorials really.
I love your project idea Nate and I can’t wait to see updates. I will be following.
Edit, telecasters are the easiest to build and route as I understand because of the routing. That is my plan for my first build. That is when ever i have a chance to move one from the zillion projects I have on the table currently.
Yeah, I don’t want to dive into veneers. I’m willing to layer thicker slabs of wood depending on what is available (say I find something I really want that’s too thin on its own for a guitar body so I need something else for the back). I’m also willing to laminate thinner planks on edge (or end) similar to how folks make cutting boards depending on what I find.
Swamp ash is a maybe, if I find some. I’m going to try to use whatever I can find in a shop in town so I can put hands on it and see the grain and such. This is just one of the shops I’ve been keeping an eye on. There are many other random reseller shops in the area. Some of the best ones don’t have websites and have actual salvage wood. Old barn wood and such. Possibility of getting some old chestnut this way.
This is the shop that has some storm debris salvage they’re curing. I bought some western red cedar planks from them a few years back for an outdoor dining table I built.
I bought a huge slab of beli wood here for built-in shelving. I have a small piece left over I could theoretically use. But the way I’d have to cut it and glue it back together to make a guitar body blank would be less than ideal as the grain wouldn’t remotely match. They do have a pretty nice selection of native woods.
This is the kind of thing I want to do. I can probably do it for a good bit less in materials (assuming I don’t count my labor hours). Even if I buy one of their fancy necks. Could also get a Warmoth neck. I don’t want to buy a bargain basement neck, as I don’t plan to cheap out on any parts I have to buy.
I did one guitar build (from parts, not a complete guitar made by me!): a Strat. I have also done a complete restoration (basically like building a guitar from renovated parts) of a tele. I have also levelled the frets on several guitar necks, which greatly improved their playability. I realise that you are probably a lot more practical and experienced than I am with wood etc, but I would advise that you try doing a cheaper guitar build from parts before going headlong into an extremely expensive guitar build with very high cost premium parts.
I think that even doing a partscaster build, there are plenty of things you can get wrong as a rookie. I know, I did, even though I watched a ton of videos for every step of the build. My second project, the tele renovation went so much smoother.
My Strat was made from high quality parts, but nowhere near as expensive as what you are looking at. I made a few mistakes, some of which have no relevance for how the guitar plays - just cosmetic, but I see them every time I pick it up. Other than me, probably only a real luthier would see those mistakes, but I know where they are. Then there were some mistakes (not catastrophic) just coming from inexperience. They were fixable, fortunately, and for one job I had to get the help of a luthier. In particular, I didn’t know enough about guitar necks to make sure the neck I bought was 100% OK before I actually did the fret levelling and treating the wood. It’s only when I did the build that I realised that I should probably have returned the neck before doing anything to it. The neck cost around $400 from a very reputable company and I really should have got a replacement. With the help of a luthier and at very little cost I got it all alright. But it’s not a mistake I’d like to make with a much more expensive neck.
I think the most difficult thing for your build will be making the neck pocket on the guitar body fit just right with your neck, and as someone else mentioned, getting the bridge in exactly the right place for the hardware and scale length you choose for the neck. Not wanting to screw those things up with a build of very expensive or cherished parts (eg the body you intend to make from specially sourced wood), I would probably practice first by doing a cheap build. You never know, it might end up better than you expect anyway. I realised during my tele restoration that you can actually make a very nice playing and sounding guitar from not much money at all. I’m super happy with my tele and it didn’t cost a lot - 50 for the old 2nd hand guitar and 200 in parts. I know thats not what you ultimately want, but it might help to ensure that you don’t make too many mistakes on your premium build.
Another thing: I think a tele is the easiest first build. Loads of great resources for building teles and Strats. I think the tele is easier - less routing front and none on the back.
Hi Nate,
it’s great to see you starting!
Now that we were just talking on the subject a few days ago, I felt I finally have to commit too and stop only talking about things
I don’t know how you feel about it, but you can do your own shape of guitar. I definitely want to do that.
And certainly I’d include some bevels similar to a stratocaster “armrest” I think I had seen this been named somewhere, because my Les Paul shape guitar with it’s weight and the hard edges feels uncomfortable - at least when sitting.
I love that idea with the reclaimed wood!
And I also want to make my guitar like you said, so that you can see and feel the wood - and also give it some radiuses, not hard edges - that feels much better to the touch (to me).
I am glad to follow your thread and see what will happen!
Howdy,
Sounds like a fun project. As a woodworker, I built 2 LP style guitars in the last few years (still trying to learn to play though, they were easier to build than play). I too looked for books but found none, although as you might guess…plenty of good YT videos from talented people. Here’s a link to Tornelli Guitars. Here explains the process very well, tools, types of wood etc.
I used scraps of cherry and white maple on one of my builds and the second has a back of sapele with top of eucalyptus. I too purchased the necks as that is quite challenging with special tools tool. As for electronics, my first build I did the solder thing…second build I bought a set of pots and connections that were all connected and just had to insert a few wires into a wire connector…simple. Couple of decent humbuckers and patience and it all came together. You do have to pay close attention to neck alignment and angle to the body and pickups. If you are looking for a starting point for templates, here’s a link where you can download a PDF.
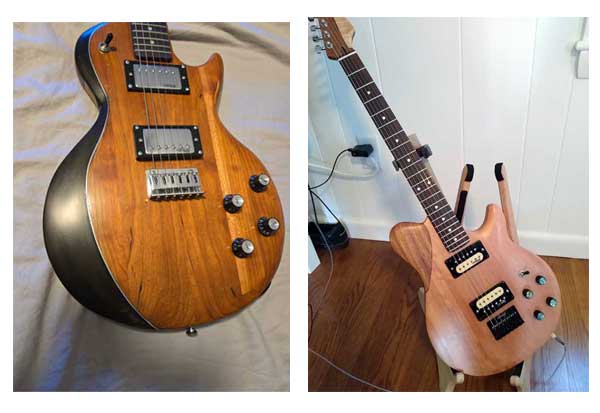
Attached is a pic of my builds. lemme now if you have questions about specials tools or anything else. Took me a about 50-60 hours to build.
I’m really not worried about the practicality of the job. I’m not going to go hard and rush through it. This build is going to take some time. Lots of reasons for it, and not the least because some stuff is going to be dictated by tool rentals.
Good tip on ensuring the neck is in good shape before committing to using it. Would you be willing to share which company that neck you bought came from? More practically-speaking, a Warmoth neck is more realistic from a cost perspective on this particular guitar than the fancy Aluminati neck.
From a cost perspective, the wood for the body is likely going to be one of the least expensive parts of it, given what it is that I’m looking for. Even though the links I posted above contain lots of exotic woods, that’s not the sort of stuff I want to use here. So if I flub that and need to redo it because stuff doesn’t line up, well, the biggest thing I’ll be out is time. I’ve looked at a bunch of guitar kits, too, and those don’t really save that much money unless I buy a really cheap one. And the work that they eliminate from the project is the kind of work that I want to do.
I forgot to mention above, but I’ve done soldering far more detailed than a guitar will require. The beli wood shelves have channels routed in them for LED strip lights. Space was so tight that I had to solder everything instead of using the snap connectors like I used for my under-cabinet lights. The strips I used are RGBCC strips with 6 leads squeezed into less than 1cm of space. I had to do 8 of them for the shelves. And as mentioned above, there are some options that don’t even require soldering. Though that won’t necessarily be a deciding factor for me.
I’m not going to use an exact template. I’ll use a basic shape as a rough starting point but I’ll make my own changes to it. And I’ll certainly give it comfy shapes. I’ve been running this through my head and I think I’ll make some test shapes with MDF before I start cutting the wood for the final guitar.
Thanks for the resources. I’ve already watched some youtube vids and I know I’ll watch some more (starting with the link you shared). But for sitting down with the project, I’d prefer to have a book open. It’s easier to refer to specific things that way. I might do a LP-style guitar later if I like doing this. But I figured since I already have one, I’d make something different than what I already have.
Yesterday evening I ran across more guitars built from reclaimed wood. PRS is making some, and they include wood from Hurricane Maria in Puerto Rico. They’re substantially less expensive than the Aluminati Floodcaster (a little grumpy the name is already chosen – and by a local builder no less) I linked above and if it was just about that, I’d choose one of these. But the wood they used doesn’t mean anything to me, and that’s a critical part for me about this project.
Speaking of shapes, I do like some of PRS’s double cut shapes. Barlow guitars are gorgeous, too. I obviously won’t be attempting that level of detailed wood work, but you can call them an inspiration with how they showcase natural wood grain.
I bought a torrefied maple neck from Amzn…like these. it was about 100 bucks and well made although I did modify the headstock shape a little to match my wood and style choice.
As far as reclaimed wood for the body…I’d certainly wanna make sure it was good and solid, no cracks, checks or and such defects. I suppose you could get a reclaimed slab, mill it down to the thickness of a top and glue it to a more solid back piece.
For neck alignment to body, pickups and bridge, I bought am inexpensive laser level, like this and set it on the headstock, once I set the neck in the pocket and had routed out the pickup cavities and bridge location. Had a nice straight beam to align it all…
From what I’ve managed to determine, I can use gnarly-looking wood and if it has voids and such, I can do an epoxy pour on it to fill those defects.
I’ve seen folks do this with burls and live edges and other oddly-shaped cuts of wood. Even watched a video where a guy made an epoxy pour guitar out of stacks of colored pencils. It adds work and expense but gives a bit more flexibility with material selection.
Sure…if that is the look you are after…go for it. Just keep in mind that the epoxy pour stuff adds weight to the wood or pencils or whatever you are using. Epoxy is much denser that wood. That density will also affect the overall tone and resonance of the guitar body, if that is of concern to you. You’ll also have to use a heavy duty planer or CNC machine to mill down that hardened epoxy to make it flat.
The neck I bought was made by AllParts. Some of their necks are made in Japan and some in the USA. Mine was made in Japan. It was a Strat neck with roasted flamed maple unfinished, 12-16" radius, rosewood finger board, modern with medium jumbo frets.
I got a modern one because I didn’t like the idea of a truss rod adjustment at the heel, which is common on vintage style necks.
The flamed maple and the rosewood is very high quality. What I found is that although they don’t say what the frets are made of (so I assume nickel not stainless steel) they were a LOT harder than the Squier frets I levelled previously to this build. So I guess the frets will also last longer.
The frets needed quite a bit of work and I also rolled the fretboard edges (which is easy) and smoothed off the end of the frets. They state this clearly on their website that levelling and polishing will be required.
I got unfinished because I wanted a very smooth oiled finish. The unfinished necks are already well sanded but I sanded mine more to get it super smooth before applying oil (just a couple of layers). Applying the oil is very satisfying. I was quite underwhelmed by the neck when it arrived but it really pops when you add oil. Take a look at my Strat build to see.
There are not many pictures of the neck but I can take more.
I’m not too concerned about it weighing more. If I wind up going this route, any voids I fill with epoxy will be small and I’ll see about filling them with decorative chips of stone or whatever. I’m not going to make a guitar that looks like a river table or something. I suppose if I fill the space with enough decorative bits, I could get away with using CA glue.
The leftover piece of beli wood I have will wind up being a console table and I already have some decorative stone chips and CA glue to fill and stabilize some small cracks. There’s a couple larger ones where I’ll probably use epoxy.
I do have access to a planer through the community tool rental shop. I was planning to use one anyway. Especially if I wind up using some reclaimed wood, I’m sure a planer will be beneficial.
Pretty sure I’ve seen a couple vids of people essentially doing the same thing with a router on a sled. I’m sure doing it that way is even more work, but it’s an option.
I built a strat style guitar a few years ago. I watched many a YT video, quickly learning there are many ways to do everything! However, by far, without a doubt, the best resource I found was this forum:
It reminds me of this forum. Active with experts and first timers with a culture of encouragement and support. It has threads for complete builds and deep dive threads created by experts about for example, neck shaping, pickup winding, and geometry
I have a few book suggestions. First is “Make your own electric guitar” by Melvyn Hiscock (I bought the second edition used for about $20 shipped. The 3rd edition was closer to $60). Anyway one of the chapters is about overall design with a great section on how the nut, neck, neck angle, bridge, and strings geometrically relate to each other. This concept is key to ending up with a playable guitar (Many other things need to be done right too, and are covered in the book, but geometry is the foundation).
“Electric Guitar and Bass Design” by Leonardo Espennato, covers much of the same territory as the Hiscock book, with additional chapters on the body shape, aesthetics, balance, neck angle, sitting and standing ergonomics and playing comfort. If you straying far from known designs, these are important to consider.
Finally, “Electrified, the art of the contemporary electric guitar” by Robert Shaw, is a coffee Table book with probably 100, 2-3 page spreads of beautifully photographed guitars and guitar details organized by luthier. IMHO, everyone is a work of art. Great book for inspiration. I think I found it in the bargain table at a bookstore - when they still had bookstores ;-(
I had similar thoughts as you about making it from wood with a story. And yes, I even filled some of the defects with epoxy. I created a build thread over at TDPRI that I mentioned above. Read through and notice how helpful everyone is.
Great book recommendations. I’ll be looking those up before I start buying any parts or materials. I have some ideas, but if there are solid reasons to do something else, then I’ll make some changes.
I’ll also look at that forum. Though I need another forum account like I need a hole in the head. Gonna take some time to work through your thread. It’s a long 'un.
EDIT: I just placed an order for used copies of the first two books mentioned. Shipping is NOT fast so it’ll take a minute. And that’s fine. I’m in no rush here.
FWIW, I’m really digging these necks. Looks like I’ll probably be in it for around $500 if I get it with fretwire and nut installed and pre-finished. Could save a bit if I skip getting it prefinished. Which is probably just as well. I don’t think I necessarily want a nitro finish. I’m leaning towards an oiled finish.
My copy of this book arrived yesterday and I’ve started working through it. So far it’s giving me good stuff to think about regarding the sort of guitar from a shape and aesthetics standpoint that I want. Looks like the author presents a pretty solid process for coming up with a final design so I’ll certainly be working through that. Curious to see what the author has to say about wood selection.
so I was out scoping the wood situation today. The one place I linked that had all the miscellaneous exotic stuff certainly had a LOT of exotic wood. Most unlabeled and not marked for price, but that wasn’t what I wanted, anyway.
They didn’t seem to have much native stuff around. What they did have was “mantle stock” and mostly white oak. The sorts of hunks where you could probably make a handful of bookmatched guitar bodies.
I went to another place I wasn’t really expecting to find much, but I knew had a huge variety of stuff so I figured it would at least be worth a look. Yeah there were maybe only a dozen slabs of wood or so and most weren’t the sorts of dimensions I need. But there was ONE slab of awesome spalted maple I just couldn’t turn down and which came home with me. Now my wife wants me to make her an electric ukulele. And I’ll have still more left over that I can play with for other things.
Interestingly, this place had a pretty large cartload of slabs sitting outside in their loading are and most were covered in mud (and very explicitly “not for sale”). Made me start thinking about the Floodcasters I linked above. I have a sinking suspicion that the reason the timing on that local luthier having those available is a little hinky based on what the sawmills told me is because the slabs were already cut when the storm hit and they wound up in the floodwaters some way or another.
I think I’m going to have some neighbors (who have a HUGE laser engraver/cutter in their garage for their business) laser engrave some design on the headstock. I don’t know what at this point, but it’ll be a nice personal touch.
Thanks. The way I see it, if I’m working on the uke body at the same time as the guitar body, there are a number of steps that would just be more efficient for me to work on the two at the same time.
Cutting out the general shape and planing in particular since I’m going to be renting tools for those jobs. Possibly routing out the various cavities. The router is one tool I haven’t decided if I want to rent or purchase. They aren’t huge and they aren’t super expensive, so I might just buy one. In which case routing work won’t necessarily be important to do together. So I can just rough out the uke body and then set it aside until the guitar is finished. I won’t start any of the ergonomic carves or sanding on the uke body until I’m finished with the guitar.
I found a spot to download a vector graphics file meant to play with to design your own guitar shape. This is associated with one of the books I bought - and the one that I’ve been reading.
I’ve been browsing through general guitar body shapes and I think I’m leaning towards something with the general proportions of a PRS S2 shape with some variations.