Using a capo – playing different chord shapes and staying in the same key
A capo is a guitarist’s friend.
A capo can be used to change the key of any given chord progression. This involves playing the exact same chord shapes but placing the capo somewhere on the neck away from the nut to change the key. This has the effect of raising the pitch. This is how many people think of using the capo - changing the pitch to suit a vocalist’s range. Of course, if a song already requires a capo, it is possible to lower the pitch by moving it down the neck or removing it altogether. Again, this would usually be done to suit a singer’s vocal range.
Alternatively, a capo can be used to play in the same key as a given chord progression. This necessitates using chords whose fingering / shapes will be different from the original chords. The reasons for doing this may vary. To find ways of playing the progression with chord shapes that are easier to play, perhaps if the given progression involves lots of barre chords or difficult shapes. It allows a way to find chords that give a different sound (chord voice) that sound more pleasing. Another reason might be when two guitarists are playing and each seeks to achieve separation in the sound and texture of the chords they play. It might be to seek chord shapes that allow lots of possibilities for embellishments if say, playing melodic or folk fingerstyle.
In this topic, we will be exploring only the second of these two uses.
Using a capo – playing different shape chords and staying in the same key.
The capo position sometimes makes the chord shapes you must choose to keep in the same key as the open chord progression nice and easy to play. Capo 7 above is an obvious candidate for easy shape chords with the capo. Sometimes the capo position makes the chord shapes you must choose to keep in the same key as the open chord progression difficult and awkward to play. Capo 10 above is really a bit yuk, both because of the barre chords needed and because the access on an acoustic to those high frets is very difficult.
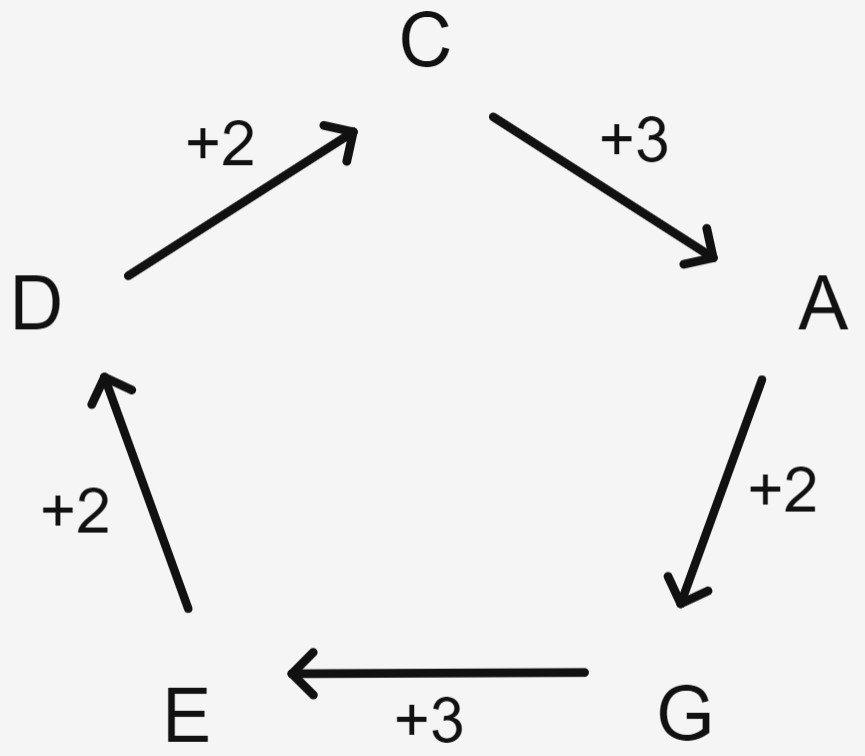
The initial chord progression was in the key of D, it started on the chord D, using a D shape. When the capo positions were applied, moving sequentially further up the neck, the starting shapes became C, A, G, E. Putting the five together gives: D, C, A, G, E
You should recognise those five letters. The starting letter is immaterial so long as the actual sequential ordering stays the same. If rearranged, you get: C, A, G, E, D
Say you have a chord progression starting on a C shape chord in open position (in other words C Major chord). To figure out your capo positions, you need to figure how you can play a C Major chord using the shapes of CAGED in sequential order starting with C.
C shape (you already have that in open position)
A shape (capo at 3)
G shape (capo at 5)
E shape (capo at 8 )
D shape (capo at 10)
CAGED is what you should see within that framework.
Say you have a chord progression starting on a G shape chord in open position (in other words G Major). To figure out your capo positions, you need to figure how you can play a G Major chord using the shapes of CAGED in sequential order starting with G.
Say you have a chord progression starting on an E shape chord in open position (in other words E Major). To figure out your capo positions, you need to figure how you can play an E Major chord using the shapes of CAGED in sequential order starting with E.
If you look at the examples above, you hopefully can see that a pattern is apparent for the number of frets to raise the capo between each particular pair of chord shapes within the CAGED sequence.
From C shape to A shape it is always 3 frets higher.
From A shape to G shape it is always 2 frets higher.
From G shape to E shape it is always 3 frets higher.
From E shape to D shape it is always 2 frets higher.
From D shape to C shape it is always 2 frets higher.
In the cheat sheet, every upper case letter (spelling out CAGED) describes a chord shape.
If these are played in the open position then they will, of course, be identical to the names of five matching major chords.
Every +2 or +3 describes how many frets to move the capo up the neck so you can play the same actual chord using the next named shape.
If the initial or starting chord shape is played with a capo, not in the open position, then the CAGED describe only the shape, not the actual name of the chord being played.
[1] Capo +3 frets. Use an A shape with capo at fret three to play a C Major chord.
[2] Capo +2 additional frets. Use a G shape with capo at fret five to play a C Major chord.
[3] Capo +3 additional frets. Use an E shape with capo at fret 8 to play a C Major chord.
[4] Capo +2 additional frets. Use a D shape with capo at fret 10 to play a C Major chord.
[5] Capo +2 additional frets. Use a C shape with capo at fret 12 to play a C Major chord.
You hopefully noticed that [5] is simply an octave repeat of the open position which is why I only spoke of four capo options above. The fifth option takes you back to the start.
Now, no matter which of the five chord shapes you are starting from, you can always figure out how many frets to capo up from that position. That holds good if your start point is open position chord shapes or if you are starting from having a capo on and you need to count up or down from that position. To count down you would just reverse the direction of the arrows and move the capo down the same number of frets.
To know the shapes of all other chords in the progression, you can translate directly using the roman numeral system of labelling chords in a key.
Below is an amended diagram with all seven diatonic chords for the keys of C, A, G, E and D plus their Roman numeric labels.
Let us suppose that there is a song you want to play and you have learned it with capo at fret two using chord shapes G, C, D and Em. These equate to the actual chords of A, D, E and F#m. I have marked this starting position on the diagram by placing a red box around the G shape.
Options.
Capo down two frets (-2 by reversing the direction of the arrow from G) and play the shapes A, D, E and F#m. These are now obviously open chords with no capo required (although F#m is a barre chord).
Capo up an additional three frets (+3) from the start point (that is at fret 5) and play chord shapes E, A, B and C#m.
Capo up an additional five frets (+3 then +2 cumulatively) from the start point (that is fret 7) and play chord shapes D, G, A and Bm.
Capo up an additional seven frets (+3 then +2 then +2 cumulatively) from the start point (that is fret 9) and play chord shapes C, F, G and Em.
In all cases you will be playing the I, IV, V and vi chords.
In all cases your actual chords will be A, D, E and F#m.
You could mark all of these options on the cheat sheet as shown:
Now it is your turn.
Use chord charts to take songs you have already learned and find a way of using a capo to play those exact same chords, in the same key, using different chord shapes. As can be seen from the examples, each starting position could give rise to four options before the repeat (octave) chord shapes come back around. Some will be preferable to others as they will involve only open chord shapes and no barres, or simply because they sound better.
Good stuff Richard. I remember playing a song in a jam with a more experienced player. I was playing in the key of D with open chords (no capo) and he accompanied me with his capo on the 2nd fret. I questioned him about it and he explained pretty much what you’ve said above, albeit in a more concise version. It was a real lightbulb moment for me and now that particular song I do in the same key (D) with my capo at 2. So the D chord is played using the C major shape.
This realization has also helped me with other songs to change the chord voicings to something I prefer. I don’t do it all that often, so mostly I use the capo to change the key, thanks for all the detail, a great topic.
This so over my head at this stage of my journey (Grade 3 module 17), but instinctively I feel I will need this soon enough. Many thanks for this practical knowledge bomb!…. Rod